Thursday, September 29, 2011

PowerShell script to update Access Request Email Address for multiple sites and webs

Yesterday I worked with one of my colleagues on a PowerShell script to update/change access request on all the sites/webs inside a web application. The requirement was to check if access request is enabled or not on a site. If yes, then update the access request email address to a specific email address. The script checks all the webs and sites inside the mentioned web application and then updates the access request email. My colleague has also blogged about this and the post can be found here.

What is access request email?
Consider a user tries to access a SharePoint site and gets "Access Denied" message. If access request are enabled on the site collection or web, then they will get similar screen like below.


If the user clicks on the "Request access" link, an email is sent to the person (who is specified in the access request settings for the site). This person can then add the user and give appropriate permissions. This is useful, if the number of users is not known when setting up the SharePoint site.

Access requests can be enabled on site (or web if the web have unique permissions) by navigating to Site Settings -> Site Permissions. In the ribbon, an option to manage access request can be seen


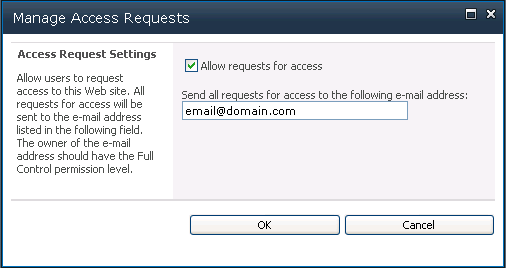
In the next screen, you will see options to enable access requests and specify the email address.


Now, consider that there are hundreds and thousands of site and webs (with unique permissions) and you need to update the email address for access requests. This would be a very tedious and time consuming task. Below is a script which will allow to update the access request email address for all the sites and webs in a single web application at once. The scripts iterates through all the sites (and webs inside the site) and checks if there are unique permissions or not. If not, then the web is skipped (because the access request settings are being inherited from the parent site). If yes, then the email address is updated.

Replace the "URL of Web Application" with your web application url. e.g. http://sharepointserver
and replace "Specify access request email here" with the email address of the person who should manage the access requests.

Add-PSSnapin Microsoft.SharePoint.Powershell
[System.Reflection.Assembly]::LoadWithPartialName("Microsoft.SharePoint")

$webapp =Get-SPWebApplication "URL of Web Application"
foreach($site in $webapp.Sites)
{
   foreach($web in $site.AllWebs)
   {
     if (!$web.HasUniquePerm)
      {
             Write-Host "Access Request Settings is inherted from parent."
      }
       elseif($web.RequestAccessEnabled)
       {
            $web.RequestAccessEmail ="Specify the access request email here"
            $web.Update()
       }
       else
      {
            Write-Host "Access Request Settings not enabled."
      }
   }
}

Let me know if this helps or if there are any queries.

Tuesday, September 27, 2011

SharePoint BLOB Cache (Disk Based Caching) fundamentals

What is blob cache?
Blob Cache is a disk based caching mechanism for Binary Large Objects (BLOBs) which can be used with SharePoint sites to decrease response times for pages within a SharePoint site. It also helps reduce database load on SQL servers and network traffic between SharePoint and SQL servers. Binary Large Objects (BLOBs) such as images, videos and audio files, large code files are retrieved from the database and can be cached and stored in a directory on the web front end server(s). Thus, when a user requests for a page/file, SharePoint server can respond faster by returning the file from the server cache rather than making a round trip and retrieving the data from SQL server every time. BLOB caching can be enabled on Web Front End (WFE) servers.

In SharePoint 2010, new the concept of byte-range requests is introduced which allows a user to select a later point in the video and being playback from that point. SharePoint also provides the concept of progressive caching, which starts streaming the video from the beginning of the large video file and the rest of the file is cached. Video files are also divided and retrieved in smaller sections to reduce load between the WFE and SQL servers. Administrators have the option to configured the size of these file sections.

BLOB caching is mostly used in Internet facing (anonymous access) or with sites which have read-only documents (which are not modified on regular basis) and static content. We can specify the files e.g. documents, images, etc to be cached on the server so that the response time decreases.

BLOB cache is usually stored in a directory on the web front end servers on the drive where SharePoint is installed. We need to ensure that the drive has sufficient space where the files will be stored. The location of BLOB cache can be set as per our requirement.
To enable BLOB cache on WFE servers, we need to configure the web.config file for the web applications. By default, disk based BLOB caching is turned off and must be enabled on front end web servers. In the web.config file of the web application, we will see a code line as

<BlobCache location="" path="\.(gif|jpg|jpeg|jpe|jfif|bmp|dib|tif|tiff|ico|png|wdp|hdp|css|js|asf|avi|flv|m4v|mov|mp3|mp4|mpeg|mpg|rm|rmvb|wma|wmv)$" maxSize="10" enabled="false" />


In this line, change the enabled attribute from “false” to “true”. If needed specify the location where the files need to be stored and the type of files which need to be cached. To add or remove the file types from the list of file types to be cached, for the path attribute, modify the regular expressions to include or remove the appropriate file extension. Size of the cache can also be specified. The default is set to 10 GB under the “maxSize” attribute.


Additionally, if the product is SharePoint Server 2010, we can enable “SharePoint Server Publishing Infrastructure” at the site collection level where we need to use Object caching.  Once the Publishing feature is enabled on the site, we can then enable Object caching by navigating to site settings -> Site Collection Object Cache.

Advantages of BLOB Cache
  • Disk based caching is extremely fast. Decrease in response time.
  • Eliminates the need for round trips between database and SharePoint servers for every request.
  • Security trimmed caching.
  • Can specify which files to be cached and can also restrict the types of files which need not be cached.
  • Setting BLOB cache for one web application does not affect performance of other web applications which do not have BLOB cache configured.
  • The files are cached on the server only if it is requested for the first time on that WFE. Thus, only the required files are cached and each WFE maintains its local copy of cache.
  • Each server uses less CPU time and energy to serve the same page after the initial rendering.
Disadvantage of BLOB Cache
  • The site’s performance is temporarily affected while the files to be cached are first written on the disk.
  • BLOB caching can only be configured at web application level. There is one BLOB cache per web application. Hence, if there are two different site collections – one of which contains static (needs BLOB caching) and other dynamic (does not need BLOB caching), then we need to separate the two site collections and store them in two different web application. 
  • In some scenarios where the files are large in size and number, BLOB caching may require lot of hard disk space and hence may need additional hard ware to accommodate the files. We need to use a hard drive which has sufficient space and which will be used by few processes as possible to avoid conflicts during cache retrieval.
  • As each WFE maintains it own copy of cache, the information (about which files need to be cached) is not synchronized. Thus, if WFE1 has “file1.jpg” cached but if WFE2 gets the request for that same file, WFE2 will make a round trip to SQL to fetch the file for the first time. It is not aware that the file is cached on WFE1.
  • Also, as the data is not synchronized, there are chances that each server can have different copies of the file and upon request the end user might see two different files. 
  • In case few of the files are corrupted, we may need to reset the entire index file on WFE server and rebuild the cache.
  • BLOB caching works only for items stored in document libraries on SharePoint site.
  • BLOB caching cannot be used with Web Applications that use Web Gardening.
Performance:
Let us test the performance with and without blob cache. The performance of the page also depends on the amount of media and content (that is cached on the server) present on the page. If the content cached is more, then the performance improvement can be seen very easily. If there are lesser image or media files, then the performance improvement might go unnoticed.

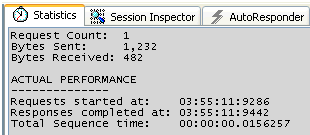
e.g. Following are the page load time for a test page on SharePoint site. The page contains a image file – “SharePointDeveloperToolbar.jpg”. The following data considers the time taken for the file to load before and after the blob cache settings.

Page load time with blob cache
Approximately 0.015 seconds for that single image file.

Page load time without blob cache
Approximately 0.031 seconds for the same image file.

The above is only for one single image file on the page. If we consider all the media elements on the page, then the difference can be seen easily.

Friday, September 23, 2011

SharePoint People Picker and Active Directory

Introduction:
SharePoint People Picker enables end users to enter either username or part of the username/display name and have the input resolved against a source that is holding user information (mostly active directory, but we can also use other directory sources).
Following is the screenshot of how a people picker page looks in SharePoint 2010.


Note: The following part of the article considers that SharePoint Picker People is using classic (Windows Integrated Authentication). When SharePoint People Picker uses classic authentication method, we can use stsadm setproperty commands. If the web application is using Claims based authentication, then stsadm setproperty commands would not cause any effect on the configuration.

How people picker works:
Following is the sequence of activities that occur when you try to search for a user in people picker
  • User submits a query in people picker
  • The query is sent to one of the Web Front End (WFE) servers. The server which is handling the request performs a lookup in DNS for the domain controller server holding the Global Catalog Service.
  • DNS returns the I.P. address of the domain controller holding GC. SharePoint will use any random port on it’s server and connect to the Domain controller server on port 3268. Port 3268 is the LDAP over TCP port used by Global Catalog service.
  • SharePoint will initially ask for some information from DC which will let SharePoint know the authentication mechanism that is supported, LDAP capabilities, end points, etc.
  • If the Active Directory requests for authentication, SharePoint will use the web application’s application pool account to send a LDAP query.
  • SharePoint will now send a LDAP query (for the username which the user requested) to the DC server. The query is created using “System.DirectoryServices” namespace. If the server is a standalone installation and the application pool is running under Local system or Network Service, then DOMAIN\MACHINE_NAME will be used for authentication. Once username is found in the directory, Windows APIs will return the SID of the user. Using the SID, further information about the user is retrieved from the Active Directory.
  • DC sends the response back to the SharePoint server.  System.DirectoryServices uses “DirectorySearcher” object to formulate the search response. A “SearchResultContainer” object is sent containing “SearchResults” which were returned by the “FindAll” method.
    Refer: http://msdn.microsoft.com/en-us/library/ms180881(VS.90).aspx
  • The information is parsed and displayed in People Picker.

We know now that SharePoint initially queries DNS and then communicates with the Domain Controller holding GC to get the details of the user. For the communication to happen successfully, we need to ensure that the following ports are open between SharePoint and Domain controller (holding GC).

On SharePoint Server:
  • TCP/UDP 135, 137, 138, 139 (RPC)
  • TCP/UDP 389 (LDAP default port)
  • TCP 636 (LDAP SSL default port)
  • TCP/UDP 53 (DNS) 
  • TCP/UDP 88 (Kerberos)
  • UDP 464 (Kerberos Change Password)

On Domain Controller:
  • TCP/UDP 135 (RPC)
  • TCP/UDP 389  (LDAP default port)
  • TCP 636 (LDAP SSL default port)
  • TCP 3268 (LDAP Global Catalog)
  • TCP 3269 (LDAP SSL Global Catalog)
  • TCP/UDP 88 (Kerberos)
  • TCP/UDP 53 (DNS)
  • TCP/UDP 445 (Directory Services)

Following ports are optional
  • TCP/UDP 749 (Kerberos-Adm)
  • TCP port 750 (Kerberos-IV)

If people picker is pulling up users from another domain, then to support the communication between domains inside the corporate network requires at least a one-way trust relationship in which the perimeter network trusts the corporate network.
On the other domain controller (or if the communication occurs through ISA), the following ports are required to be kept open for inbound connections in the DC/ISA server.
  • TCP/UDP 135 (RPC)
  • TCP/UDP 389 (LDAP default port)
  • TCP 636 (LDAP SSL default port)
  • TCP 3268 (LDAP Global Catalog)
  • TCP 3269 (LDAP SSL Global Catalog)
  • TCP/UDP 53 (DNS)
  • TCP/UDP 88 (Kerberos)
  • TCP/UDP 445 (Directory Services)

    Optional Ports:
  • TCP/UDP 749 (Kerberos-Adm)
  • TCP port 750 (Kerberos-IV)
In case of any queries, please feel free to drop a comment and I will respond back.


Wednesday, September 21, 2011

When was the last you felt like an expert on SharePoint?

Microsoft is presenting the ESP Live Webcast Series, conducted by Subject Matter Experts from Microsoft, to educate you about the advantages that you might be missing out on.

1. SharePoint Architecture - Services Stack
The first webcast, on 19th September, will take you through SharePoint Architecture - Services Stack, introducing you to the various services SharePoint Server 2010 offers. Some of the key topics that we will talk about include:
  • Access Services
  • Dashboards
  • Enterprise Content Management
  • Enterprise Search
  • Excel Service

2. SharePoint Architecture - Farm Deployment
The second webcast, on 21st September, will be on SharePoint Architecture - Farm Deployment, introducing you to the overall elements that comprise a SharePoint farm and how administrators can leverage interfaces to manage their farm. Topics we will cover in the webcast are:
  • Farm Topology
  • Load Balancing Servers
  • Planning Availability
  • Disaster Recovery
  • Service Applications

Designing and Creating Workflows with Visio 2010

One of the biggest challenges in implementing a successful workflow is not becoming an expert in coding/creating a custom workflow but to design it as per the requirement of user or business needs. Typically, a consultant would talk to business users, understand business process and then design the workflow. This design is then handed over to SharePoint professionals to implement on SharePoint.

Visio makes the task of analyzing the requirement and actually putting it down on paper. We can draw diagrams, create flowcharts for workflows and the best part is that now, we can export the workflow in .vwi format (Visio Workflow Interchange) and then import it in SharePoint Designer 2010. Thus, a consultant or a business power user can create Visio diagrams for the workflow and SharePoint professionals can easily import them in SharePoint Designer 2010 and implement it on lists/sites.

Creating a workflow using Visio 2010:
Visio 2010 provides us with specific workflow templates that can be directly imported in SharePoint Designer 2010.


When we select “SharePoint Workflow” template in Visio, we can see that there is a set of shapes available. These shapes relate to the actions and conditions in SharePoint Designer 2010.


Use this template and create a workflow diagram as per your business requirement. Once the diagram is done, Click on “Export the diagram” from “Process” tab in Visio. This will check the file for any errors and export the file and save it as a .vwi format file.


Importing the workflow diagram in SharePoint Designer 2010:
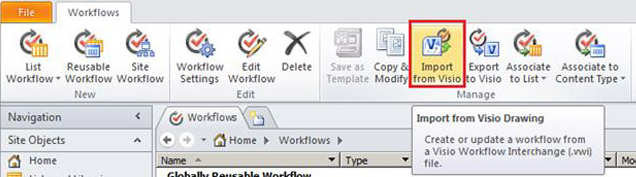
Open SharePoint Designer 2010 and open the site/list where you would like to associate the workflow. Under the workflow tab, you can see the button for Importing the workflow from a Visio document.


Once the workflow is imported, it can be further customized or details can be added. You can then publish the workflow on the required list/site.

You might find these articles useful